Introduction
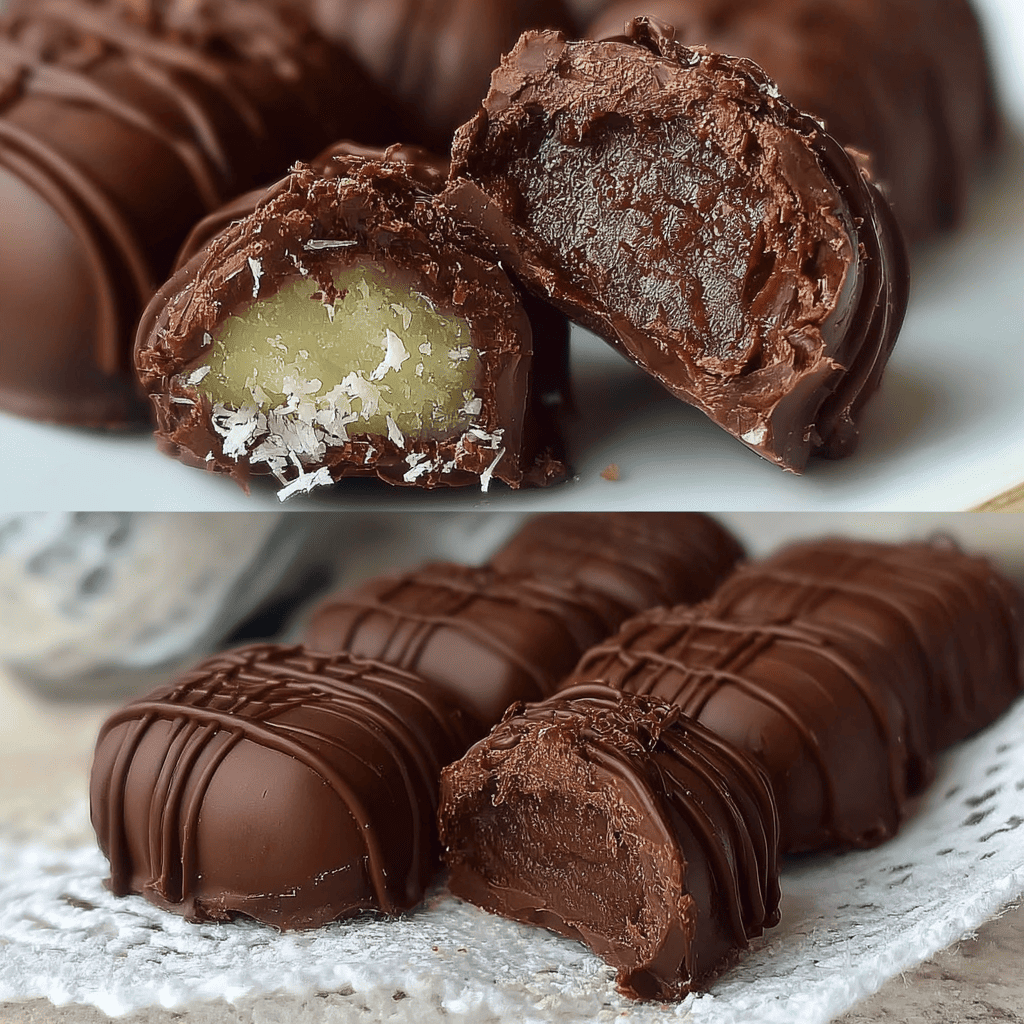
Homemade Prestige chocolate bonbons are proof that luxury desserts do not need to be complicated. These rich, smooth, and elegant chocolate treats look like they came straight from a high-end chocolate shop, yet they can be made at home using only four simple ingredients. No baking, no special equipment, and no advanced skills are required—just a few minutes and a love for chocolate.
Chocolate bonbons are traditionally associated with celebrations, gift boxes, and special occasions. However, this easy homemade version makes them accessible for everyday enjoyment. Whether you are preparing a quick dessert for your family, creating a homemade gift for a loved one, or adding a sweet touch to a party table, these bonbons are a perfect choice.
This recipe is especially appealing for food bloggers and AdSense publishers because quick desserts with minimal ingredients are highly searchable and evergreen. People constantly look for fast, no-bake chocolate recipes, making this content valuable year-round. With the right presentation, images, and formatting, this recipe can perform very well in search results while keeping readers engaged.
Why This 4-Ingredient Chocolate Bonbon Recipe Works
One of the main reasons this recipe is so successful is its simplicity. Each ingredient plays an important role in creating the perfect texture and flavor:
Chocolate provides richness and structure
Sweetened condensed milk adds sweetness and creaminess
Butter enhances smoothness and shine
Coatings add texture and visual appeal
Because there are no unnecessary ingredients, the chocolate flavor truly shines. This makes the bonbons taste indulgent and premium, despite the short preparation time.
Ingredients (Only 4!)
200 g (7 oz) milk or dark chocolate – choose good-quality chocolate for best results
½ cup sweetened condensed milk
2 tablespoons unsalted butter
Cocoa powder, crushed nuts, or shredded coconut (for coating)
Optional Flavor Enhancers (Optional)
These are optional and do not change the base recipe:
Vanilla extract
A pinch of salt
Instant coffee powder
Orange or lemon zest
Step-by-Step Instructions
Step 1: Melt the Chocolate
Break the chocolate into small pieces and place it in a heatproof bowl. Melt the chocolate using a double boiler or microwave. If using a microwave, heat in 20-second intervals, stirring each time, until fully melted and smooth.
Melting the chocolate slowly prevents burning and ensures a glossy finish.
Step 2: Add Butter
While the chocolate is still warm, add the butter. Stir gently until the butter melts completely and blends into the chocolate. This step gives the bonbons a silky texture and professional shine.
Step 3: Mix in Sweetened Condensed Milk
Pour the sweetened condensed milk into the chocolate mixture and stir until fully combined. The mixture will become thick, rich, and
Discover the book that will change your life! Click on the image to buy it on Amazon now!
The Everyday DASH Diet Cookbook: Over 150 Fresh and Delicious Recipes to Speed Weight Loss, Lower Blood Pressure, and Prevent Diabetes (A DASH Diet Book)
Click Here to Buy
Step 6: Coat and Finish
Roll each bonbon in cocoa powder, crushed nuts, or shredded coconut. Place them in mini paper cups or on a parchment-lined tray. Chill for another 10 minutes before serving.
Hints for Success
Always use good-quality chocolate for the best flavor
Do not overheat the chocolate when melting
Chill the mixture just until firm—over-chilling makes shaping difficult
Work quickly if your kitchen is warm
Store finished bonbons in the refrigerator for best texture
Serving Suggestions
These homemade prestige chocolate bonbons can be served in many ways:
As a dessert after meals
With coffee or tea
On dessert platters for parties
In gift boxes for holidays and celebrations
As a sweet treat during special moments
Their elegant appearance makes them suitable for both casual and formal occasions.
📌 Save This Recipe!
Love this recipe? Don’t forget to pin it to your favorite board so you can make it later!
Health Benefits (In Moderation)
While chocolate bonbons are a treat, they do offer some benefits when enjoyed responsibly. Dark chocolate contains antioxidants that may support heart health and improve mood. Making bonbons at home allows you to avoid artificial preservatives, excess sugar, and unnecessary additives commonly found in store-bought chocolates.
Using nut coatings adds healthy fats, protein, and minerals. You can also reduce sweetness by choosing dark chocolate with a higher cocoa percentage.
Nutritional Information (Per Bonbon – Approximate)
Calories: 90–110 kcal
Fat: 6 g
Carbohydrates: 9 g
Sugar: 8 g
Protein: 1–2 g
Nutritional values vary depending on chocolate type and coating used.
Variations and Substitutions
Dark Chocolate Bonbons
Use 70% or higher dark chocolate for a rich, intense flavor and reduced sweetness.
Nut-Filled Bonbons
Press a roasted hazelnut, almond, or peanut into the center before rolling.
Coffee Chocolate Bonbons
Add ½ teaspoon instant coffee powder to enhance chocolate flavor.
Coconut Chocolate Bonbons
Use shredded coconut both inside and outside for a tropical twist.
Dairy-Free Option
Use dairy-free chocolate and coconut condensed milk.
Luxury Chocolate Shell
Dip shaped bonbons into melted chocolate and let them set for a professional finish.
Frequently Asked Questions (FAQs)
Can I make these bonbons ahead of time?
Yes. They can be made up to one week in advance and stored in an airtight container in the refrigerator.
Do I need special molds?
No. These bonbons are hand-rolled, making them beginner-friendly.
Can I freeze chocolate bonbons?
Yes. Freeze them for up to one month. Thaw in the refrigerator before serving.
Why is my mixture too soft?
This usually happens if the chocolate was too warm. Chill the mixture longer before shaping.
Can I reduce the sweetness?
Yes. Use dark chocolate with a higher cocoa percentage.
Storage Tips
Store in an airtight container in the refrigerator
Keep away from heat and direct sunlight
Serve chilled or at room temperature depending on preference
Proper storage helps maintain texture and flavor.
Why This Recipe Is Perfect for AdSense Websites
This recipe is ideal for monetized food blogs because:
It targets high-search keywords like easy chocolate dessert and no-bake chocolate recipe
It encourages longer reading time with clear sections and FAQs
It is evergreen content with year-round demand
It allows space for ads without disrupting user experience
Adding high-quality images and internal links will further increase engagement and revenue potential.
Conclusion
Homemade Prestige chocolate bonbons with four ingredients are the perfect combination of simplicity and elegance. In just minutes, you can create rich, creamy, and beautiful chocolates that rival store-bought varieties. Whether you are making them for yourself, your family, or as a thoughtful homemade gift, these bonbons never fail to impress.

Homemade Prestige Chocolate Bonbons with 4 Ingredients, in Minutes !!
Homemade Prestige chocolate bonbons are proof that luxury desserts do not need to be complicated. These rich, smooth, and elegant chocolate treats look like they came straight from a high-end chocolate shop, yet they can be made at home using only four simple ingredients. No baking, no special equipment, and no advanced skills are required—just a few minutes and a love for chocolate.
Ingredients
-
-
200 g (7 oz) milk or dark chocolate – choose good-quality chocolate for best results
-
½ cup sweetened condensed milk
-
2 tablespoons unsalted butter
-
Cocoa powder, crushed nuts, or shredded coconut (for coating)
Optional Flavor Enhancers (Optional)
These are optional and do not change the base recipe:
-
Vanilla extract
-
A pinch of salt
-
Instant coffee powder
-
Orange or lemon zest
-
Instructions
Break the chocolate into small pieces and place it in a heatproof bowl. Melt the chocolate using a double boiler or microwave. If using a microwave, heat in 20-second intervals, stirring each time, until fully melted and smooth.
Melting the chocolate slowly prevents burning and ensures a glossy finish.
Step 2: Add Butter
While the chocolate is still warm, add the butter. Stir gently until the butter melts completely and blends into the chocolate. This step gives the bonbons a silky texture and professional shine.
Step 3: Mix in Sweetened Condensed Milk
Pour the sweetened condensed milk into the chocolate mixture and stir until fully combined. The mixture will become thick, rich, and glossy. This forms the base of your bonbons.
Step 4: Chill the Mixture
Cover the bowl and place it in the refrigerator for 15–20 minutes. The mixture should be firm enough to scoop and shape but not hard.
Step 5: Shape the Bonbons
Using a spoon or small scoop, take portions of the mixture and roll them into bite-sized balls. Lightly grease your hands with butter if needed to prevent sticking.
Step 6: Coat and Finish
Roll each bonbon in cocoa powder, crushed nuts, or shredded coconut. Place them in mini paper cups or on a parchment-lined tray. Chill for another 10 minutes before serving.
T-Fal 10" Hard Anodized Nonstick Fry Pan with Lid, Oven Safe up to 400°F (Lid 350°F), Dishwasher Safe, Versatile Black Skillet
Click on the image to buy it on Amazon now!
Click Here to Buy
